Story about a newbie VMware EUC engineer part one: Upgrade App Volumes.
This story is about my work as a EUC engineer and upgrading App Volumes Manager for the first time. I will talk about the App Volumes 4 version 2111.1 ESB Release.
If you don’t know what ESB means look here.
The rolling upgrade itself is not a difficult task you only need to take the time and preparation to do it well.
For you begin download the App Volumes Manager ISO from this location.
The following Prerequisites for a rolling upgrade are needed:
- Schedule a maintenance window to ensure that there is no service degradation during the upgrade process.
- Back up the App Volumes database.
- Create a snapshot of the App Volumes Manager servers.
- If you are using App Volumes Manager earlier than 2.18, you must first upgrade to App Volumes Manager 2.18 or later.
- Rolling upgrades can be performed from earlier versions of App Volumes 4.
For you begin you need to do a couple of things.
- Before performing a rolling upgrade, all App Volumes Manager instances must be on the same version.
- Before upgrading from App Volumes 2.x, you must stop all instances of App Volumes Manager service.
- App Volumes Agent must be upgraded only after upgrading all App Volumes Manager servers.
- Backup the configuration of App Volumes from this location C:\Program Files (x86)\CloudVolumes\Manager\nginx\conf
Now we can begin the rolling upgrade procedure and begin with the first step:
1. In the load balancer, disable the App Volumes Manager server that you intend to upgrade first.
2. Take a VM Snapshot of the App Volumes Manager server.
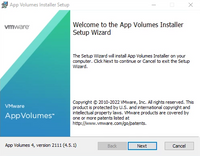
3. Mount the ISO file and start the rolling upgrade as Administrator, follow the prompts to install the App Volumes Manager.
4. Click Next.
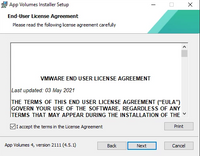
5. Select 'I accept the terms in the License Agreement' and press Next.
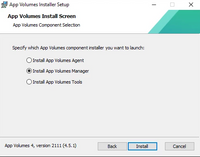
6. Select 'Install App Volumes Manager' and press Next.
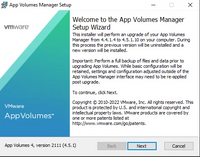
7. Click Next.
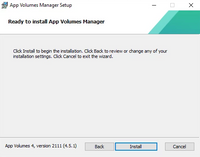
8. Click Install.
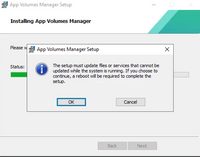
9. Click OK. This is a manual reboot. you will get this popup two times.
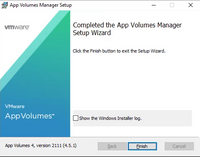
10. Click Finish.
11. Reboot the server manual.
12. After the rolling upgrade ensure that the App Volumes Manager is reachable and you can access the App Volumes Manager admin UI.
13. Select “Join the VMware Customer Experience Improvement Program” if you like and press OK.
14. Navigate to the App Volumes Manager Log folder, locate the svmanager_setup.log file, and ensure that exceptions or database errors are not present in the log file that is located at: C:\Program Files (x86)\CloudVolumes\Manager\log\svmanager_setup.log.
15. In the load balancer, enable the App Volumes Manager server that you disabled in an earlier step.
16. Test App Volumes from the upgraded manager server.
17. Repeat the steps in this procedure for all the App Volumes Manager servers.
After the upgrade u can begin upgrading the App Volumes Agent to the intend version.
Prerequisites for upgrading the agent:
- Schedule a maintenance window to ensure that there is no service degradation during the uninstall and subsequent upgrade process.
- Upgrade the App Volumes Manager servers first.
- Unassign all AppStacks and writable volumes from the target computer where you plan to upgrade the agent.
App Volumes Agent update procedure.
1. Log in as administrator.
2. Start the App Volumes installer.
3. Select the App Volumes agent component click Install.
4. Click Next to begin the installation.
5. Click Finish when you see the confirmation message.
To upgrade the agent silent you can use the following command:
msiexec.exe /i "Location_AppVolumesAgent.msi" /qn MANAGER_ADDR=<AV_Manager_FQDN/IP> MANAGER_PORT=<port> EnforceSSLCertificateValidation=<0or1>
1: Certificate validation is activated
0: Certificate validation is deactivated
The following parameters are optional:
MANAGER_ADDR
MANAGER_PORT
EnforceSSLCertificateValidation.
Additional information about the App Volumes rolling upgrade:
Perform Rolling Upgrades: Link
Considerations for Performing Rolling Upgrades: Link
Upgrade App Volumes Agent Silently: Link
Thank you for reading if you have a question, remarks? Please let me know!

